Brown tips, scattered patches, and collapsing fronds can point to very different problems in a fern. This guide helps you read the location and texture of the damage, check the roots and growing conditions, and choose a response without making the stress worse.
Match the Browning Pattern to Your Next Step
- Crispy tips with dry mix and a lightweight pot: Water thoroughly until excess drains, empty the saucer, and follow the dry-root route.
- Crispy edges while the mix remains lightly moist: Check for a heating vent, air conditioner, hot ceiling-level position, or abrupt humidity change; correct the air exposure rather than watering early.
- Tan or bleached patches concentrated on the window-facing side: Filter intense direct sun or increase the plant’s distance from the glass, then follow the light-damage route.
- Broad browning or collapse with wet, stale-smelling mix: Pause watering and inspect the roots and crown promptly for rot.
- Tip burn after feeding, with white crust on the mix or pot: Stop fertilizing and investigate soluble-salt buildup or softened water.
- Fine stippling, webbing, random raised bumps, or expanding lesions: Isolate the fern for containment and inspect both sides of the fronds before selecting pest or disease management.
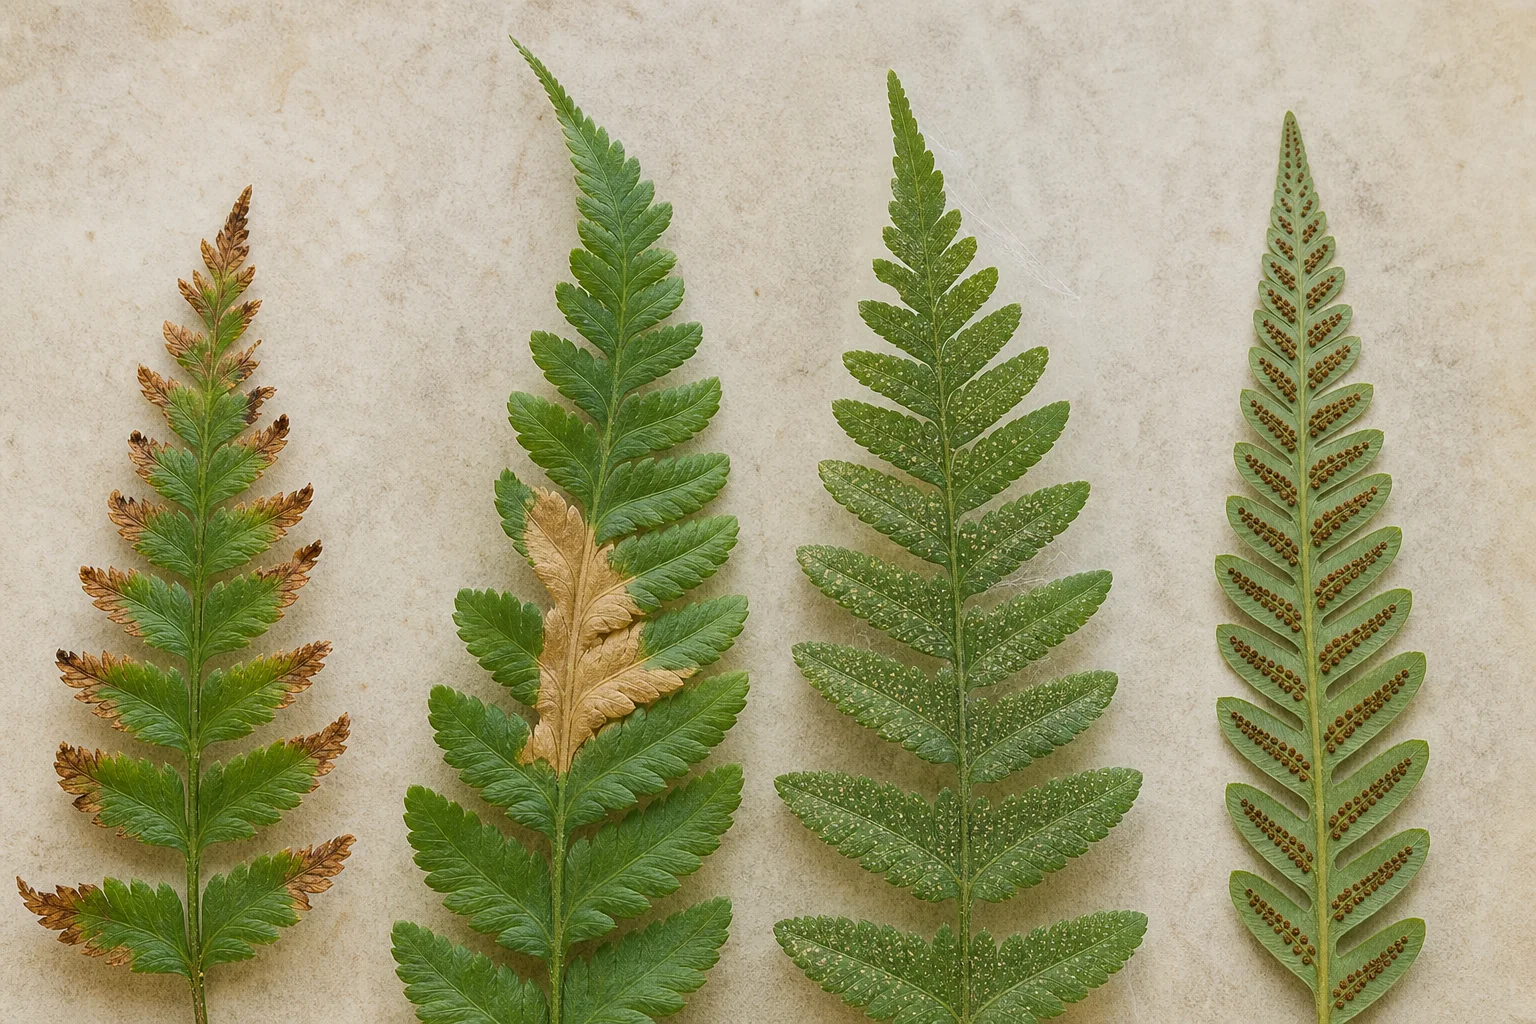
- Only an old outer frond is brown, or evenly arranged brown dots occur beneath otherwise green fronds: Check for normal aging or spore-producing structures before treating anything.
Dryness, Root Trouble, Sun, or Pests: What Separates Them
Dry roots and dry air commonly produce brittle tips and margins. A fern that has missed water may have dry mix throughout the root ball, a noticeably light pot, and fronds that lose crispness before browning. Low humidity or hot airflow is more likely when the mix stays appropriately moist but damage is worst on the side nearest a vent, radiator, or warm ceiling.
Root stress from excess moisture can also leave fronds brown because decayed roots cannot supply them effectively. Unlike straightforward drought, the pot stays heavy, the mix remains wet for many days, and yellowing or limp collapse may accompany the brown tissue. Soft dark roots, a weak crown, or a stale smell strengthen this diagnosis. Adding more water could accelerate the decline.
Excess light and heat usually cause localized tan, pale, or scorched areas on the most exposed fronds. The damage often follows a move, seasonal increase in sun intensity, or contact with hot window glass. Most tropical houseplant ferns need useful indirect light, not a dark corner, so filtering harsh sun is preferable to moving the plant into deep shade.
Fertilizer or mineral injury tends to begin at leaflet tips and move inward. Recent heavy feeding, repeated light fertilizer applications, white deposits, or watering with salt-based softened water make this route more plausible. Ferns generally have modest fertilizer needs, and overfeeding can damage fine roots as well as foliage.
Pests and leaf diseases produce less uniform patterns. Spider mites may cause pale stippling and fine webbing, while scale insects form irregular attached bumps. Rapidly enlarging reddish-brown lesions, translucent spots, or dark areas bounded by veins are more consistent with a leaf disorder than ordinary dry tips. Regular rows or symmetrical patches of brown structures beneath a green frond are more likely to be sori, the fern’s spore-producing clusters.
Check the Root Zone Before Changing the Watering Routine
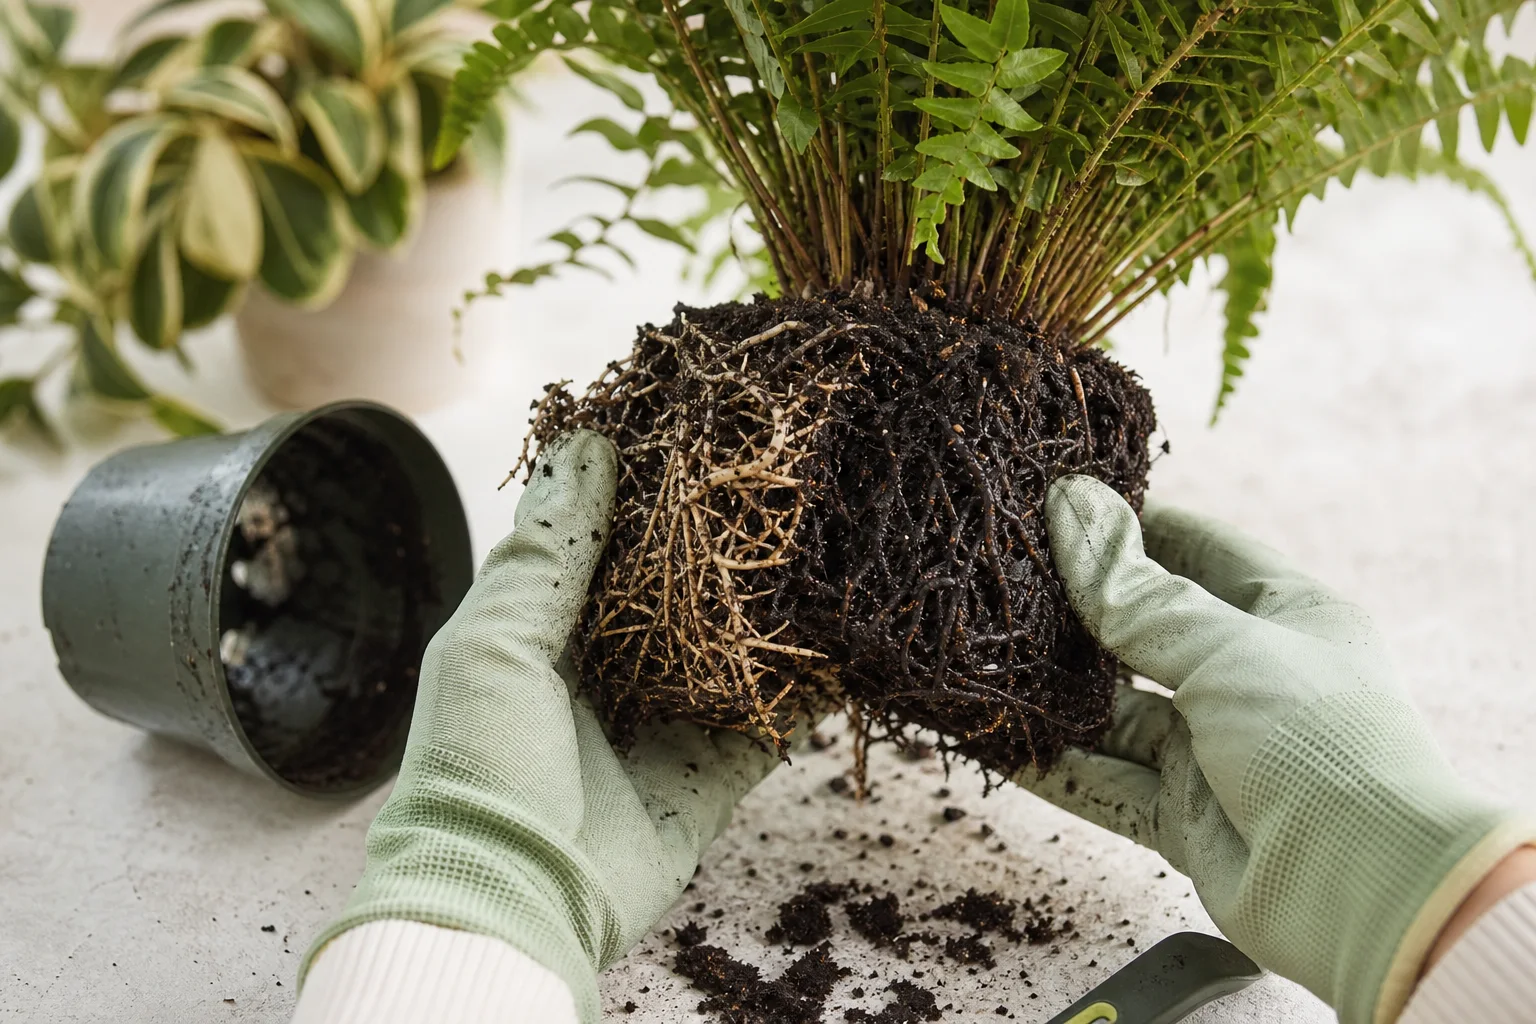
Push a finger or wooden skewer into the mix and compare the surface with the deeper root zone. Also lift the pot to learn how its weight changes as moisture is used. Many indoor ferns prefer a porous, moisture-retentive mix that is watered thoroughly when the surface begins to feel dry; this is different from keeping the container continuously saturated.
If the root ball is very dry, water slowly and evenly until liquid exits the drainage holes. A severely dried mix may repel water, so apply it in stages or briefly soak the pot, then let it drain completely. Record how many days pass before the surface begins drying again instead of switching to a rigid calendar.
If the mix remains wet and the fern is declining, slide the root ball out carefully. Healthy roots are generally firm; extensive soft, dark, or collapsing roots indicate a drainage or root-health problem. Remove clearly decayed material with clean tools and repot into fresh, airy mix in a clean container only slightly larger than the remaining root mass. Keep the crown at its previous depth.
Do not fertilize a drought-stressed or recently repotted fern. Damaged roots are less able to manage dissolved salts, and feeding does not repair dead frond tissue. Resume light feeding only after the plant is producing healthy new growth.
Make Environmental Corrections Without Creating a New Shock
Move an indoor fern away from heating outlets, air-conditioning streams, and unusually hot positions near the ceiling. If the surrounding air is persistently dry, a room humidifier can provide a more consistent change than occasional misting. Maintain some air movement around the foliage, because wet fronds combined with stagnant air may favor leaf-spot problems.
For sun injury, use a sheer curtain or increase the distance from an intense south- or west-facing window. Make the change gradually if the fern has been receiving strong light for a long period. Existing scorch will remain visible, but correctly lit new fronds should emerge without the same exposed-side patches.
If fertilizer or water quality is suspect and the roots remain healthy, stop feeding and flush the potting mix with room-temperature water, allowing plenty to drain away. Do not use water treated by a salt-based softener. Rainwater, distilled water, or an unsoftened indoor supply can be used for a trial if repeated tip burn continues despite appropriate moisture and humidity.
Species identity changes the target. Maidenhair ferns can react quickly to drying, while some button ferns and Boston fern cultivars tolerate household conditions somewhat better. Staghorn ferns are epiphytes with specialized mounting and watering needs, and plants sold as asparagus ferns are not true ferns. Use the care requirements for the identified plant rather than applying one moisture rule to every fern.
A Fern Recovery Plan for the Next Four Weeks
Today
- Choose the most likely route from the earlier pattern and root-zone checks.
- Remove standing water, stop fertilizer, and correct an obvious hot draft or intense sun exposure.
- Isolate the fern if you found webbing, insects, sticky residue, or suspicious spreading lesions.
- Trim fully brown fronds near the base with clean scissors, but retain green tissue that is still functioning.
Next 3–7 Days
- Monitor pot weight and deeper moisture without watering automatically.
- Keep corrected conditions stable; repeated moves make it harder to judge the response.
- Reinspect isolated foliage under bright light. If pests are confirmed, begin a product or physical-control plan labeled for the plant and pest, testing any spray on a small area first.
- Watch the crown and emerging fronds rather than expecting existing brown sections to recover.
Next 2–4 Weeks
- Look for firm new fronds with less tip damage and a more predictable drying interval.
- Adjust watering in small increments if the mix still dries too deeply or remains wet for an unusually long time.
- Resume diluted fertilizer only during active healthy growth and according to the product label.
- Escalate the investigation if browning continues into every new frond despite corrected roots, light, airflow, and moisture.
What Recovery Looks Like and When the Crown May Be Lost
Brown fern tissue is dead and will not turn green again. Judge progress by the condition of newly unfurling fronds, a stable crown, and whether the spread of browning slows. A fern with a firm crown or viable rhizomes may replace damaged foliage, but the pace varies with species, season, light, root loss, and the severity of the original stress.
Widespread root decay, a soft central crown, or repeated collapse of new growth carries a poorer outlook than cosmetic tip burn. Remove severely affected plants from contact with the rest of the collection while the cause is unresolved. A local extension plant clinic can help assess unusual lesions, foliar nematodes, or other problems that cannot be distinguished confidently from photographs alone.
Outdoor deciduous ferns normally brown and die back as their growing season ends. Frost can also brown exposed fronds without killing a hardy underground crown. Confirm the species, expected seasonal behavior, and local hardiness before assuming that autumn or winter browning requires treatment.
Find the Cause of Your Fern’s Brown Fronds
Several fern problems produce similar brown foliage but require opposite watering or environmental changes. Add clear photos of the whole plant, damaged fronds, potting mix, and roots to narrow the diagnosis before making another major care adjustment.
Diagnose My FernFrequently Asked Questions
Can I cut the brown tips off my fern?
Yes. Use clean, sharp scissors and follow the natural outline of the leaflet, leaving a narrow brown margin rather than cutting into healthy green tissue. Trimming is cosmetic and does not correct the cause. Remove an entire frond near its base when it is fully brown.
Should I mist a fern with brown leaves every day?
Misting raises moisture around the foliage only briefly and may leave fronds wet, which can favor some leaf-spot problems. A humidifier and stable root moisture are generally more useful. If you mist for cleaning, allow the foliage to dry with gentle air circulation.
Could tap water be turning my fern brown?
It is possible, particularly when salt-based softened water is used or deposits have accumulated in the pot. First rule out dry roots, saturated mix, and hot airflow. If those conditions are appropriate, flush the mix and compare new growth after using rainwater, distilled water, or unsoftened water.
Why did my fern turn brown after I brought it indoors?
The plant may be reacting to a sudden change in light, temperature, humidity, or watering speed. Keep it away from vents and cold glass, check for pests that arrived with it, and stabilize care. Some older frond loss may occur while the plant adjusts.
Are the brown dots under fern leaves scale insects?
Evenly spaced dots, lines, or patches beneath otherwise healthy fronds are often sori, which contain spores. Scale is usually less orderly and may occur on stems as well as fronds. Inspect the structures with magnification before applying a treatment that could injure delicate foliage.
Why are new fern fronds turning brown before they open?
Damage to emerging growth deserves prompt attention. Check whether the crown is staying wet, drying excessively, exposed to cold or heat, or showing soft tissue and spreading lesions. If multiple new fronds fail despite stable care, seek help from a plant clinic because crown or root damage may be advanced.
Sources & Further Reading
- Growing Tropical Ferns Indoors University of Minnesota Extension
- Fern Diseases Penn State Extension
- Ferns: Indoor Growing University of Connecticut Home Garden Education Center
- Indoor Ferns Clemson Cooperative Extension Home & Garden Information Center
- Leaf Damage on Houseplants Royal Horticultural Society
- Bumps on Fern Leaves Mississippi State University Extension Service
- How to Water Indoor Plants Missouri Botanical Garden
- How to Grow Ferns Royal Horticultural Society