Houseplant leaves most often turn yellow because the roots are staying too wet, the plant is getting an unsuitable amount of light, or its environment recently changed. One old lower leaf may simply be aging, but several yellow leaves—or yellowing that keeps spreading—calls for a systematic check of moisture, drainage, light, pests, and roots.
Start here: the yellow-leaf visual decision tree
Before watering, fertilizing, or repotting, photograph the whole plant and both sides of an affected leaf. The pattern matters more than the color alone.
- Is only one of the oldest, lowest leaves yellow? If the rest of the plant looks firm and new growth is healthy, go to the aging-leaf check below.
- Are several leaves yellowing at once? Feel the potting mix several inches below the surface and inspect the drainage setup.
- Is the soil wet and the plant limp? Suspect excess moisture, restricted drainage, or root damage.
- Is the soil very dry and pulling from the pot? Check for underwatering or a root-bound mix that no longer absorbs water evenly.
- Is yellowing strongest on the side facing or facing away from a window? Review light exposure and recent moves.
- Are there speckles, sticky residue, webbing, white fluff, or raised bumps? Isolate the plant and inspect for pests.
- Do none of those checks explain it? Slide the root ball out carefully and examine the roots.
Do not use one yellow leaf as proof of overwatering or nutrient deficiency. University extension guidance emphasizes that similar symptoms can result from several environmental problems, so work through the checks in order.
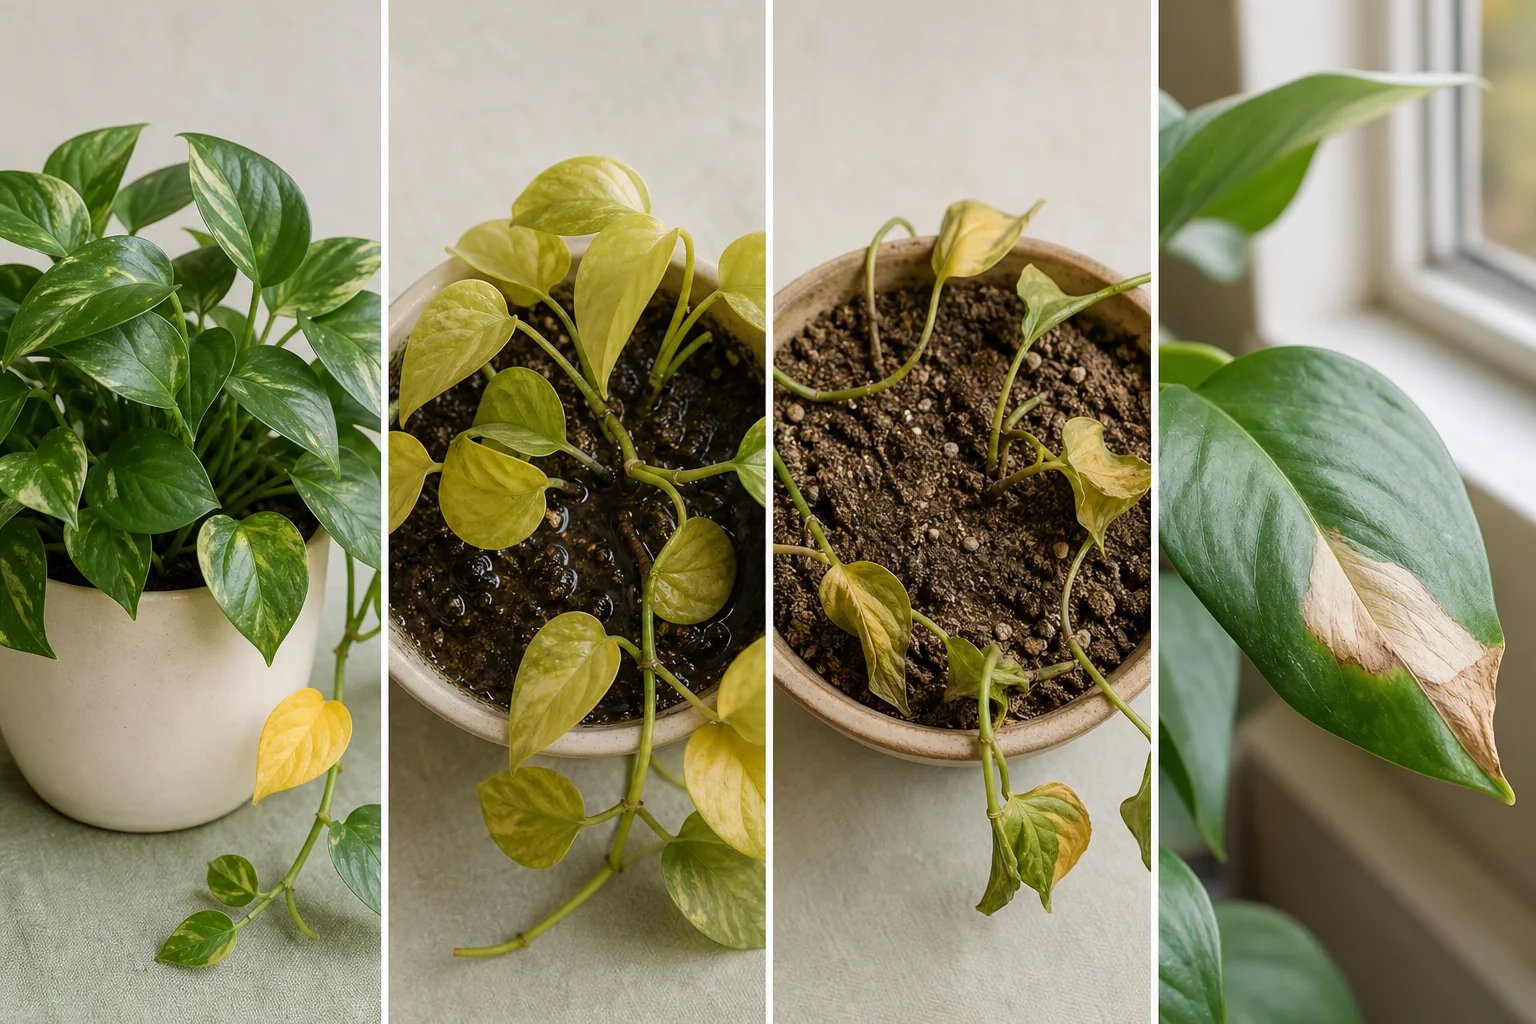
First distinction: one aging leaf or a plant-wide problem?
Probably normal aging
A single yellow leaf is less concerning when it is one of the oldest leaves at the base, yellowing progresses gradually, and the plant is still producing healthy growth. Leaves do not last forever, and some houseplants periodically shed older foliage.
Let the leaf loosen naturally or remove it with clean scissors once it is mostly yellow. Continue observing the plant rather than making several care changes at once.
More likely an active stress
Investigate further if multiple leaves yellow within days, yellowing moves upward, new leaves emerge pale, stems wilt, leaves drop rapidly, or the potting mix smells sour. Also take action if a single yellow leaf is followed by another every few days.
Photo clue: A whole-plant photograph makes progression easier to see. Take a second image from the same position three to seven days later instead of relying on memory.
Check soil moisture and drainage before watering again
Wet and dry roots can produce deceptively similar symptoms because both interfere with water delivery to the foliage. Test below the surface; the top layer may be dry while the lower root zone remains saturated.
If the mix is wet
- Pause watering and empty water from the saucer or decorative cachepot.
- Confirm that the inner pot has an open drainage hole.
- Check whether the plant sits in runoff after each watering.
- Move it to appropriate light with gentle air movement, but do not try to force-dry it with a heater or intense direct sun.
Overwatering is not defined by the amount used in one session. It means the roots remain wet too long because of watering frequency, low light, an oversized pot, compacted mix, poor drainage, or a combination of these factors. The University of Minnesota Extension recommends letting the plant and soil guide watering rather than following a fixed calendar.
If the mix is very dry
- Water slowly and evenly until excess drains from the bottom.
- If water races down the pot wall without wetting the root ball, soak the inner nursery pot briefly, then let it drain completely.
- Recheck the center of the mix afterward; extremely dry peat-based media can resist rewetting.
Do not compensate for dry soil by leaving the pot standing in water indefinitely. Future watering should reflect the species, pot size, light, temperature, and how quickly the mix actually dries.
Match the yellowing pattern to light and recent changes
Look at the plant’s location and recent history. A move between rooms, a seasonal change in window light, cold transport, air-conditioning, heating vents, or sudden outdoor sun can trigger yellowing and leaf drop.
Clues that light may be too low
- Yellowing is accompanied by weak, stretched, or leaning growth.
- The soil stays wet much longer than it did previously.
- Lower or shaded interior leaves are affected first.
- The plant stopped growing after being moved farther from a window.
Clues that light may be too intense
- Pale, bleached, tan, or crisp patches appear on the window-facing side.
- Damage began after an abrupt move into direct sun.
- A sharp boundary separates damaged and shaded tissue.
Move plants gradually when changing light levels. Identify the species before choosing a brighter window: a cactus, pothos, fern, and prayer plant do not have the same requirements. The University of Minnesota Extension’s indoor plant lighting guide provides examples for different light conditions.
Inspect leaf undersides and stems for pests
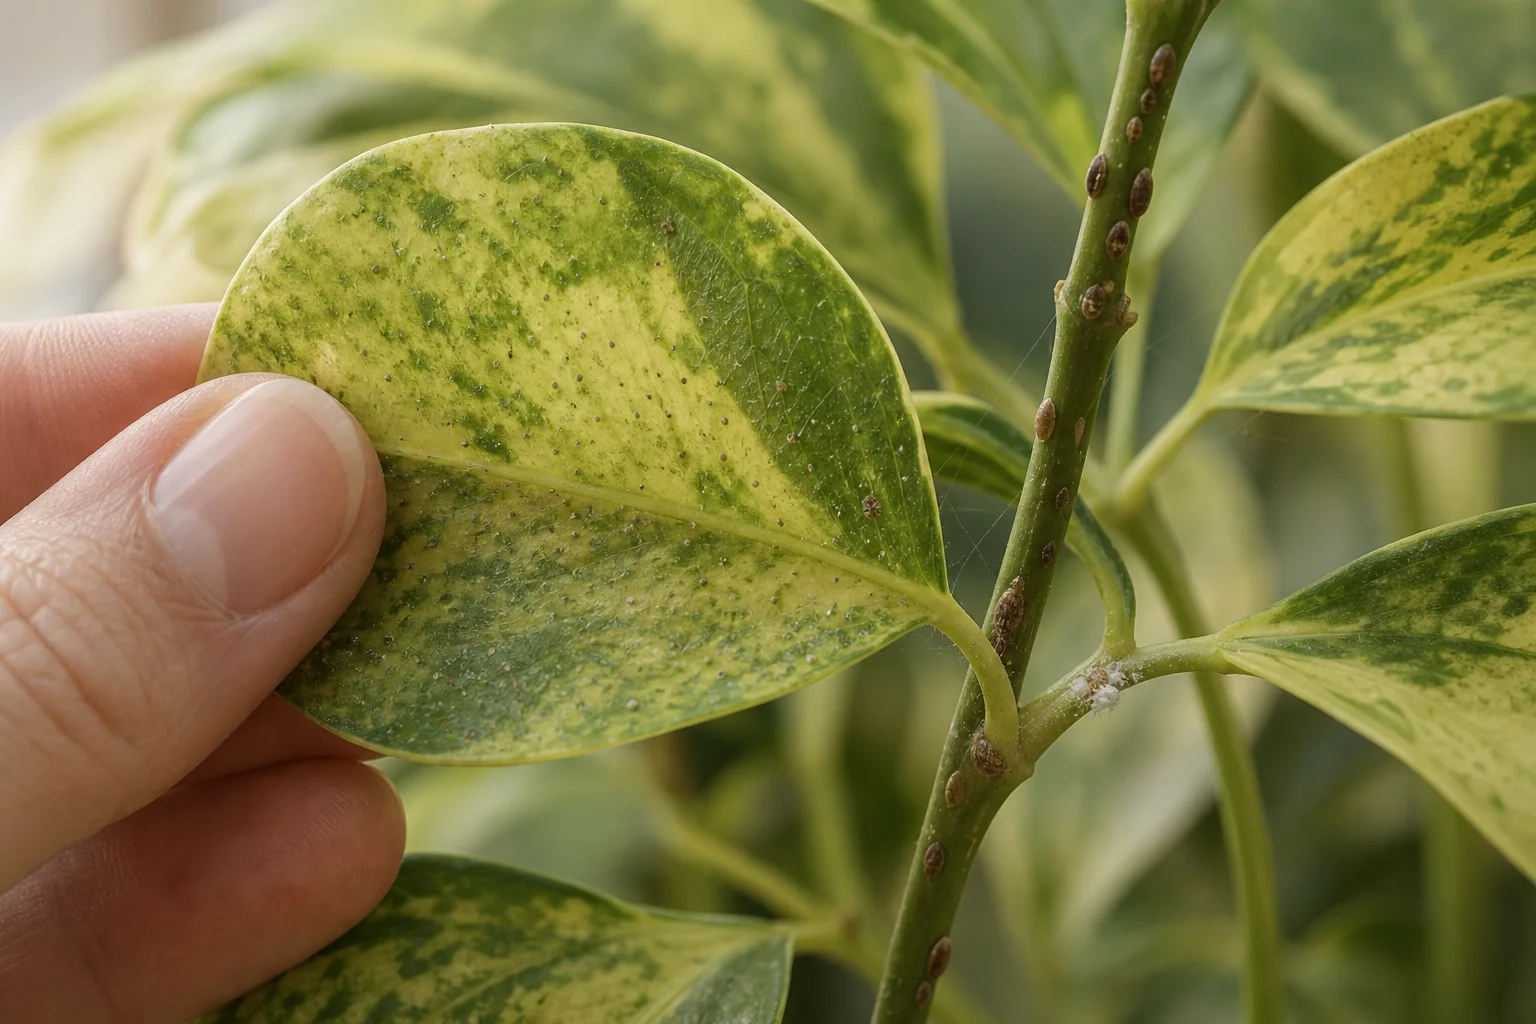
Pest feeding can cause pale dots, mottled yellow areas, distorted growth, generalized yellowing, or leaf drop. Use a flashlight and, if available, a magnifying lens. Check leaf undersides, veins, stem joints, new growth, and the point where stems enter the soil.
- Spider mites: fine pale stippling, dusty-looking foliage, and sometimes delicate webbing.
- Mealybugs: white, cottony clusters in protected crevices.
- Scale insects: immobile tan, brown, or black bumps attached to leaves or stems.
- Aphids: clusters of small, soft-bodied insects, often around tender growth.
- Whiteflies: tiny pale adults that flutter when foliage is disturbed.
Sticky residue may be honeydew from sap-feeding insects, but it is not enough to identify a specific pest. Isolate the plant from the rest of the collection and inspect neighboring plants.
For a light infestation, physically removing pests and rinsing foliage may be a useful first step. If using a pesticide, select one labeled for the identified pest and indoor plant use, follow the label exactly, test a small area first, and keep the product away from children and pets. Stressed or heavily damaged foliage may react poorly to sprays.
Check the roots only when the earlier clues justify it
Repeatedly pulling a plant from its pot can damage fine roots, so save this check for persistent yellowing, chronic wetness, sour-smelling mix, sudden wilting, or a plant that dries unusually fast.
- Support the stems and gently slide the root ball from the pot.
- Look at and smell the outer roots without breaking the root ball apart unnecessarily.
- Healthy roots are generally firm. Their color varies by species and potting mix, so color alone is not a diagnosis.
- Concerning roots are soft, collapsing, slimy, or easily stripped from their inner core. A foul or swampy odor adds to the concern.
- Root-bound plants have dense circling roots, little visible mix, or roots emerging through drainage holes. Water may pass through too quickly.
If only a small portion is rotten, trim clearly soft tissue with clean tools and repot into fresh, species-appropriate potting mix in a clean container with drainage. If most roots and the stem base are soft, saving healthy cuttings may be more realistic than retaining the entire plant.
Do not automatically move a stressed plant into a much larger container. Penn State Extension advises using a slightly larger pot when repotting; excess unused mix can stay wet too long.
Choose one correction, then watch the new growth
Once the strongest evidence points to a cause, make the smallest correction that addresses it.
- One old lower leaf: remove it when ready and continue normal care.
- Wet soil without rotten roots: improve drainage and extend the interval between waterings.
- Dry soil: rehydrate evenly and begin checking moisture more consistently.
- Unsuitable light: move the plant gradually toward conditions appropriate for its species.
- Visible pests: isolate, identify, and use targeted controls.
- Root rot: remove damaged tissue, refresh the mix, and correct the moisture conditions that contributed to it.
- Dense circling roots: repot only slightly larger with a suitable indoor potting mix.
Avoid fertilizing simply because leaves are yellow. Damaged or waterlogged roots may be unable to use nutrients, and unnecessary fertilizer can add soluble salts. Consider nutrition only after moisture, drainage, light, pests, and root health have been reviewed—and follow the product label rather than increasing the dose.
Existing yellow leaves are not the best measure of recovery. Over the next two to four weeks, watch whether yellowing slows, the plant remains firm, and healthy new growth appears. If decline continues despite corrected care, confirm the plant’s identity and requirements or seek help from a local extension service.
Get a photo-guided plant diagnosis
Photograph the whole plant, a close-up of the yellowing pattern, the leaf undersides, and the soil surface. The diagnostic tool can help organize the visible clues and suggest what to check next, but confirm the result with soil, drainage, pest, and root observations before changing care.
Diagnose My PlantFrequently Asked Questions
Should I cut yellow leaves off my houseplant?
You can remove a leaf once it is mostly yellow or easily detaches, using clean scissors if needed. If only part of the leaf is yellow, leaving it temporarily can help you monitor whether the damage is spreading. Removing leaves improves appearance but does not correct the underlying cause.
Do yellow leaves always mean a houseplant is overwatered?
No. Excess moisture is common, but dry soil, unsuitable light, environmental shock, pests, root damage, normal aging, and nutrient-related problems can produce similar symptoms. Check the soil below the surface and examine the symptom pattern before watering again.
Can a yellow houseplant leaf turn green again?
A fully yellow leaf is unlikely to be a useful indicator of recovery. Focus on whether additional leaves stop yellowing and whether new growth looks healthy. Some partially pale leaves may stabilize after the stress is corrected, depending on the cause and severity.
How can I tell overwatering from underwatering?
Test the root zone rather than judging by the leaves alone. Persistently wet mix, standing runoff, and soft roots point toward excess moisture or poor drainage. Very dry, shrunken mix and a lightweight pot suggest underwatering. Both conditions can cause yellowing and wilting.
Should I repot a plant as soon as its leaves turn yellow?
No. Repot when there is evidence of root rot, severely degraded mix, blocked drainage, or a tightly root-bound plant. Unnecessary repotting adds stress and will not fix incorrect light or watering habits.
Are yellow leaves caused by a nutrient deficiency?
Sometimes, but nutrient deficiency should not be the first assumption. Root damage, wet soil, unsuitable pH, or salt accumulation can prevent nutrient uptake even when fertilizer is present. Rule out moisture, drainage, light, and pests before feeding, and never exceed the fertilizer label.
Sources & Further Reading
- Yellowing Leaves on Indoor Plants University of Maryland Extension
- Diagnose Indoor Plant Problems University of Maryland Extension
- Spring Houseplant Care University of Minnesota Extension
- Managing Insects on Indoor Plants University of Minnesota Extension
- Lighting for Indoor Plants and Starting Seeds University of Minnesota Extension
- Repotting Houseplants Penn State Extension
- What Causes Leaves on My Houseplant to Turn Yellow or Brown and Drop Off? Iowa State University Extension and Outreach
- Troubleshooting Houseplants Illinois Extension