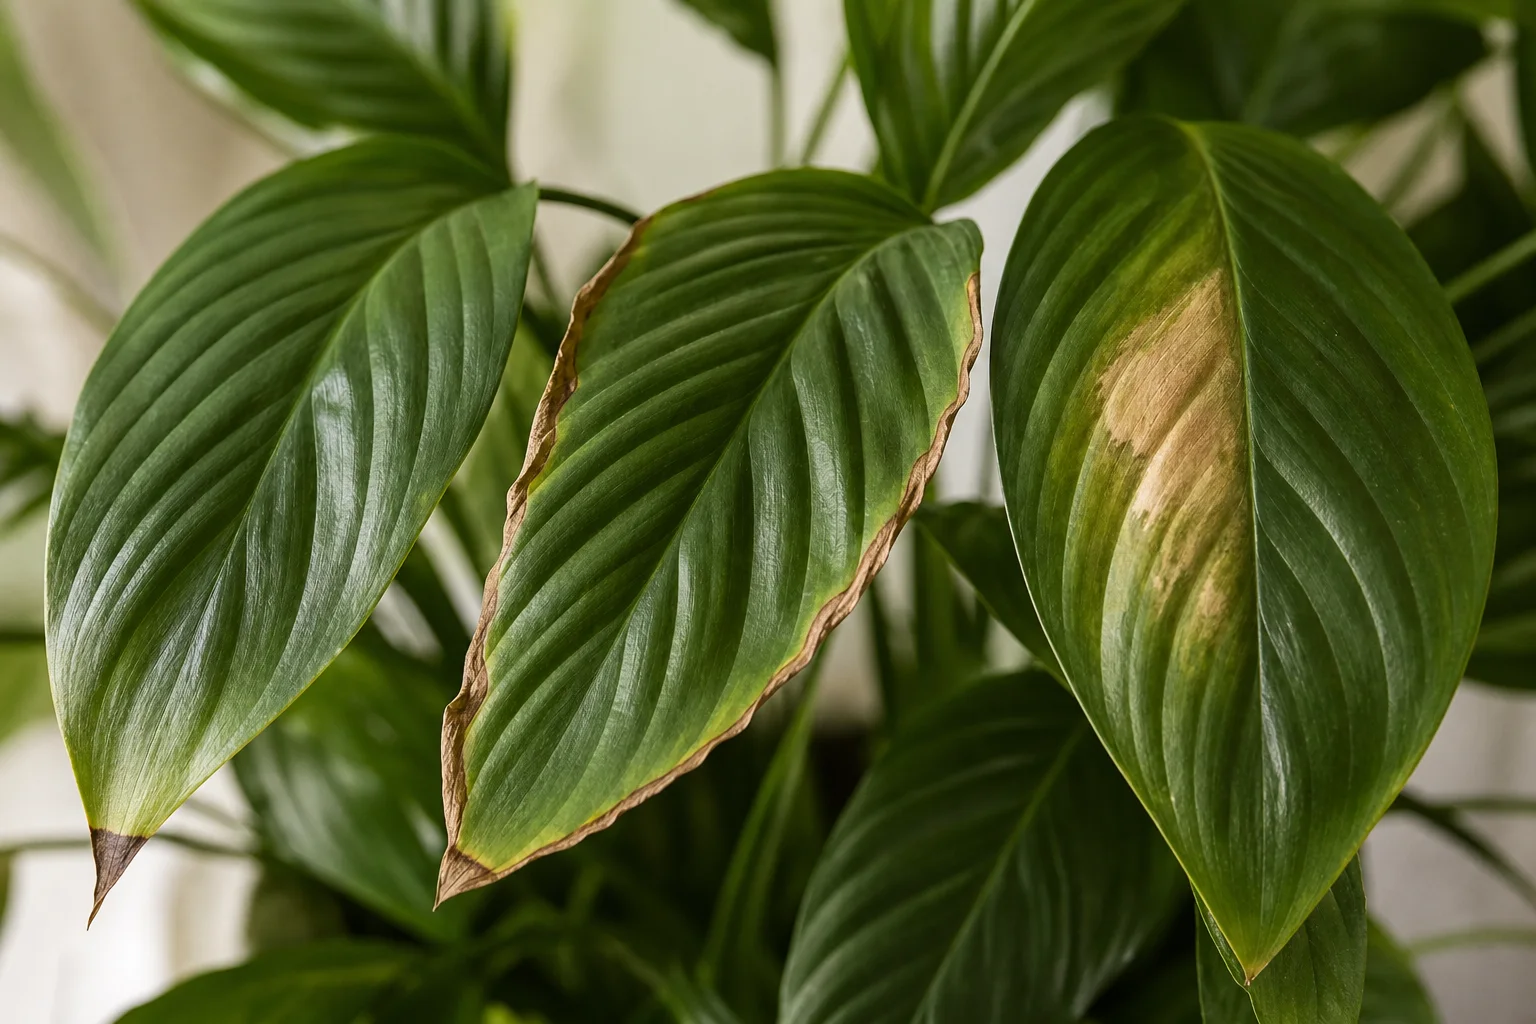
Peace lily leaves often turn brown because the roots or foliage have experienced moisture stress, dry air, direct sun, or excess mineral and fertilizer salts. Start by examining the damage pattern and checking the potting mix rather than watering on reflex. Brown tips usually suggest a different problem from large scorched patches or a plant that is declining in wet soil.
Start with the shape and location of the brown areas
Brown tissue alone cannot identify one cause. Before changing your care routine, compare the pattern across several leaves and note whether the potting mix is dry, damp, or persistently wet.
- Dry brown tips: Often associated with inconsistent watering, low humidity, or accumulated salts from fertilizer and water.
- Crisp brown margins: May develop after the root ball becomes very dry or when the surrounding air is hot and dry.
- Pale tan or brown patches on the window-facing side: Suggest excess direct sun or heat through glass, especially after the plant was moved.
- Brown areas with yellowing, wilting, and wet soil: Point toward poor drainage or damaged roots rather than simple thirst.
- Wet-looking spots, halos, or spreading lesions: May indicate a leaf-spot problem, chilling injury, or chemical damage and deserve closer inspection.
One older leaf gradually declining is less concerning than similar damage appearing quickly across new and old growth. UC Statewide IPM notes that houseplant symptoms can result from several environmental factors acting together, so use the whole plant as evidence.
Check the soil before deciding whether it needs water
Both a dry root ball and an oxygen-starved, waterlogged root ball can lead to brown foliage. The safest first check is the moisture below the surface.
- Push a finger or an unpainted wooden skewer about 1 to 2 inches into the potting mix.
- Lift the container and notice whether it feels unusually light or heavy.
- Confirm that the pot has an open drainage hole and is not standing in collected water.
If the mix is dry and the pot feels light
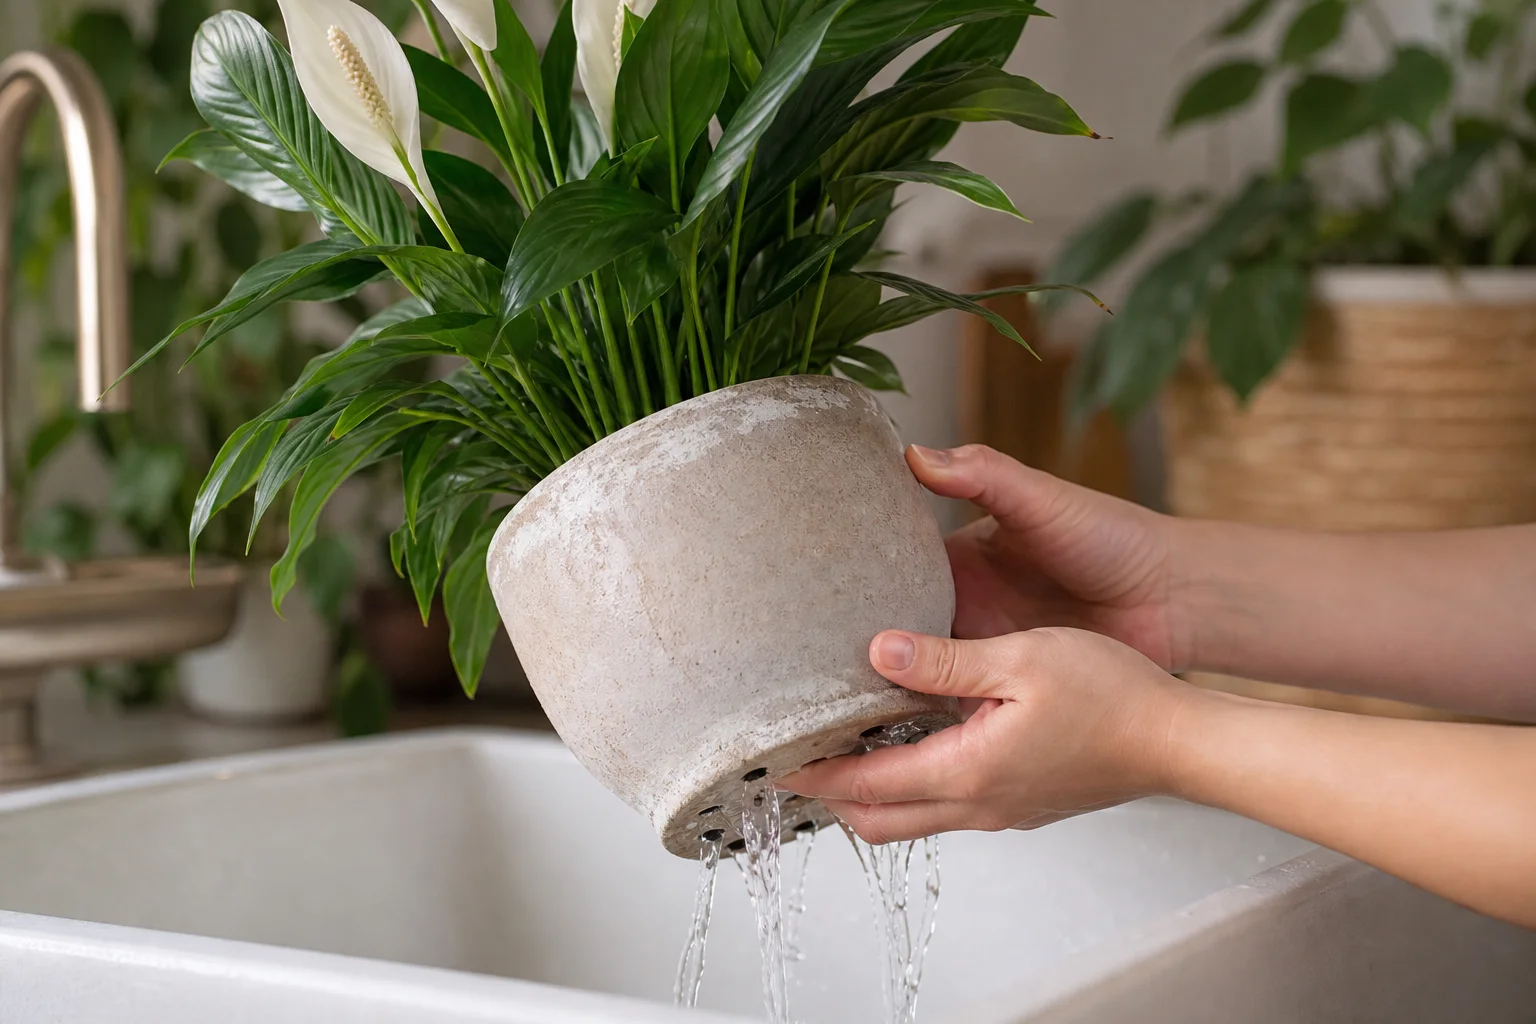
Water slowly with room-temperature water until the entire root ball is moistened and excess water drains out. Empty the saucer. If dry mix has pulled away from the pot, apply water in stages or briefly bottom-water the container, then allow it to drain fully.
If the mix is still wet
Do not add more water solely because the foliage is drooping. Move the plant to bright, indirect light, empty any cachepot, and allow drainage and air movement to improve. If the soil remains wet for many days, smells sour, or the plant continues to decline, slide out the root ball. Healthy active roots are generally firm; extensive dark, limp, or easily stripped roots can indicate root damage. Root symptoms have several possible causes, so severe cases may need a local diagnostic service rather than an assumed fungal treatment.
Clemson Cooperative Extension recommends moist but not soggy soil and warns against leaving a peace lily in a saucer of excess water.
Rule out sun scorch, dry air, and drafts
Peace lilies tolerate lower light, but they generally perform best in bright, indirect light. Strong direct sun can create bleached tan areas that later become brown and crisp. Move a scorched plant back from the window or filter the light with a sheer curtain; make the change without repeatedly relocating the plant.
Low indoor humidity is more likely to affect tips and margins than to create isolated wet spots. Browning may become more noticeable during heating season or near air-conditioning and heating vents. A room humidifier can provide a more measurable change than occasional misting. Grouping plants may also create a slightly more humid local environment, provided there is still airflow between leaves.
Keep the plant away from blasts of hot or cold air. NC State Extension identifies direct sunlight, underwatering, and low humidity as common contributors to brown peace lily tips.
Look for fertilizer and water-quality clues
Minerals from water and salts from fertilizer can accumulate in a container over time. Possible clues include a white or tan crust on the soil, residue around the pot rim, reduced growth, and repeated browning on otherwise well-watered leaves.
What to do
- Pause fertilizer while the plant is stressed.
- If the pot drains well and the roots appear sound, remove the surface crust and rinse the mix from above with several pot volumes of water. Let it drain completely.
- Resume feeding only during active growth and use a diluted houseplant fertilizer rather than exceeding its label rate.
- Avoid routinely watering with sodium-softened water.
- If browning continues despite corrected watering and fertilizing, trial rainwater, distilled water, or reverse-osmosis water for new irrigations. Judge the change by new growth because existing brown tissue is unlikely to regain its former color.
University of Maryland Extension describes white crusting as a sign of mineral or fertilizer deposits and recommends leaching freely draining potting media. A severely compacted mix, a container without drainage, or compromised roots may make repotting more appropriate than repeated flushing.
Follow a low-risk first-aid plan
If the cause is not immediately clear, avoid changing water, light, fertilizer, humidity, and soil all at once. Use this sequence so you can observe which correction matters.
- Check moisture and drainage. Correct a dry root ball or remove standing water.
- Provide bright, indirect light. Protect the leaves from strong midday or afternoon sun.
- Stop feeding temporarily. Fertilizer does not repair stressed or damaged roots.
- Inspect both sides of the leaves. Look for cottony mealybugs, scale-like bumps, webbing, stippling, or insects around new growth.
- Review recent changes. Consider repotting, a cold journey home, a new window, a heating vent, pesticide use, or a missed watering.
- Record the damage. Photograph the same leaves weekly so you can see whether brown areas are expanding and whether new leaves look healthier.
Do not repot solely because one or two tips are brown. Repotting is more relevant when the mix drains poorly, roots are severely congested, the pot lacks drainage, or root inspection reveals substantial damage.
Trim damaged leaves and monitor new growth
Brown leaf tissue does not usually become green again, but it can be trimmed for appearance. Use clean, sharp scissors and follow the leaf's natural outline. Leave a narrow brown margin rather than cutting deeply into healthy green tissue, which may create another dry edge.
If most of a leaf is brown, soft, or badly damaged, remove the entire leaf stalk near the base without cutting neighboring stems. Clean the tool before moving to another plant, particularly if the leaf has wet spots or other possible disease symptoms. University of Maryland Extension supports trimming dry brown tips with sharp scissors and removing dying foliage.
Signs that conditions may be improving
- Existing brown areas stop expanding.
- The potting mix begins drying at a more predictable rate.
- New leaves emerge without fresh tip burn or broad patches.
- The plant maintains normal firmness without repeated cycles of severe wilting.
Results vary with root health, season, light, and the extent of earlier damage. Evaluate new growth over the following weeks instead of expecting old leaves to change appearance.
Know when the problem needs closer attention
Isolate the peace lily and seek additional help if brown lesions spread rapidly, feel wet or soft, develop yellow halos, or appear alongside gray growth, stem collapse, or a foul-smelling root ball. Blackened, limp roots and continuing decline in wet soil can be associated with root rot, but laboratory diagnosis may be needed to identify a particular pathogen. Penn State Extension recommends sanitation, improved growing conditions, and isolation when disease is suspected.
A clear photo of the entire plant, close-ups of both leaf surfaces, and an image of the soil and pot can make remote diagnosis more useful. Include details about light direction, watering history, drainage, fertilizer, and how quickly the browning appeared.
Pet safety
Peace lily contains insoluble calcium oxalate crystals and can cause significant mouth irritation, drooling, vomiting, or difficulty swallowing when chewed by cats or dogs. Keep discarded leaves and the plant out of reach. If a pet may have eaten the plant, contact a veterinarian or a recognized poison-control service promptly; ASPCA Animal Poison Control provides species-specific guidance.
Compare the browning pattern with Photo Diagnosis
Upload clear photos of the whole peace lily, the damaged leaf surfaces, and the potting mix. Photo Diagnosis can help organize likely causes and the next observations to make, although root condition and care history may still be needed.
Diagnose My Peace LilyFrequently Asked Questions
Should I cut the brown tips off my peace lily?
You can trim dry brown tips with clean, sharp scissors for appearance. Follow the pointed shape of the leaf and avoid removing a large amount of green tissue. Trimming does not address the underlying cause, so continue checking moisture, drainage, light, humidity, and salt buildup.
How often should I water a peace lily with brown leaves?
Use the condition of the potting mix rather than a fixed weekly schedule. Check moisture about 1 to 2 inches below the surface and water thoroughly when the mix has dried slightly. Allow excess water to drain and empty the saucer. Temperature, light, pot size, root density, and season can all change how quickly the plant uses water.
Can overwatering cause brown peace lily leaves?
Yes. Persistently wet soil can reduce oxygen around the roots and may contribute to brown margins, yellowing, wilting, or root decline. Brown tips by themselves do not confirm overwatering; check the soil, drainage, smell, and root condition before changing your routine.
Should I use distilled water for a peace lily?
Distilled, rain, or reverse-osmosis water may help when mineral-rich or softened water is contributing to repeated tip burn. It is not necessary for every peace lily. First correct watering and fertilizer use, then compare the appearance of new growth after trialing a lower-mineral water source.
Why is only one peace lily leaf turning brown?
A single older leaf may be aging or reflecting earlier damage. Remove it if it is mostly brown and monitor the rest of the plant. Multiple leaves browning at the same time, especially new leaves, suggest an ongoing issue that deserves a moisture, root, light, and salt check.
Why are the white peace lily flowers turning brown?
The white structures are spathes rather than true petals. They commonly become greenish and eventually brown as the bloom ages. A spent flower stalk can be removed near its base with clean scissors. Browning on newly opened flowers, particularly with wet spots or pest activity, may have another cause.
Sources & Further Reading
- Peace Lily — Spathiphyllum North Carolina Extension Gardener Plant Toolbox
- Peace Lily Clemson Cooperative Extension Home & Garden Information Center
- Why Does My Houseplant Have Brown Leaf Tips and Edges? Iowa State University Extension and Outreach
- Houseplant Problems University of California Statewide Integrated Pest Management Program
- Mineral and Fertilizer Salt Deposits on Indoor Plants University of Maryland Extension
- Pest and Disease Problems of Indoor Plants Penn State Extension
- Toxic and Non-toxic Plants: Peace Lily ASPCA Animal Poison Control Center